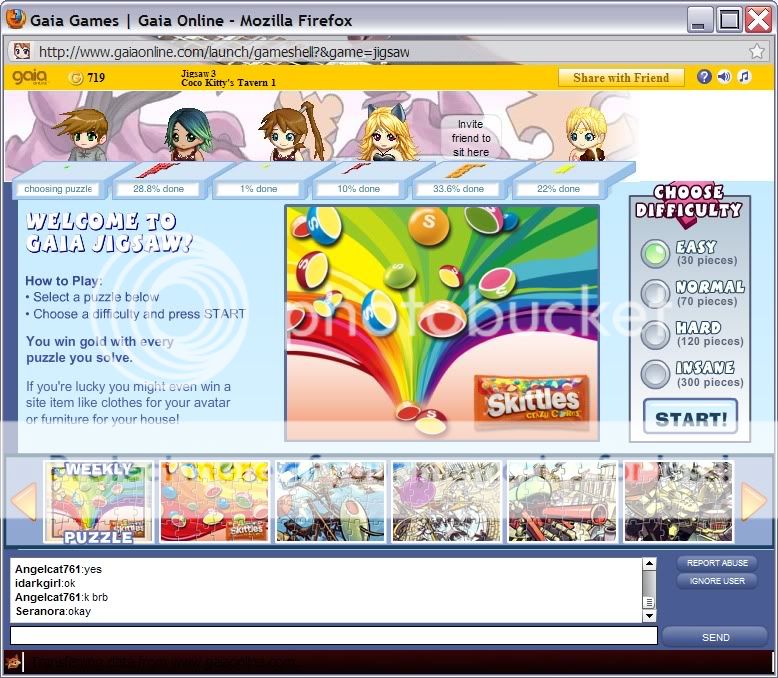
|
|
|
|
|
|
|
|
|
|
|
Posted: Wed Aug 26, 2009 9:57 pm
|
|
|
|
Home
In front of you. You will see a number of buttons. I'll be explaining what each one of them does here.
Left click on your Avatar. You will be taken to a screen like this one.
Here, you will be able to change what your Avatar is wearing. Some items affect the skins. While most are worn as clothes.
Hats
Covers all items that are worn on the head.
Tops
Covers all items that are worn on the body.
Pants
Are, well self explanatory.
Shoes
Covers all items that are worn on your Avatars feet.
Accessories and Items
Covers everything else. In this category, you can find gloves, candles. Just about any small individual touch to set your Avatar apart from the others.
Left click on whatever item you want to wear. In some cases, this will cause another options to pop up. Displaying a number of poses for that particular item. You can only choose one of these poses. For every one of the item that you have. If you want more than one. You must purchase a copy of the original item.
Under the Avatar, there are several options and I will explain each of them here.
Stand/Sit
This button will allow you to change your Avatar. Between a standing and sitting position.
Front/Back
This button allows you to either have your Avatar facing forward or away. It is important to note. That some items are only visible on the front or back of your avatar. So you will have to change your Avatars pose. In order for them to show up.
Choose Mouth Expression
You can choose between a smile, a grin. Whatever expression you feel like wearing on your Avatar. There are other expressions. That can only be used. By purchasing certain items from your Avatar.
Choose Pose
This will allow you to change your Avatars Hand placement. Like, say you want to dress your Avatar up as a Baseball Player. You could have your hands held out. Holding onto the baseball bat. Like an actual Baseball player.
Get Nekkid
Click one the Blue X to use this option. This button will unequipp all items. That you currently have on your Avatar. Use this when you want to start from scratch. Remaking your Avatar. An important note is that none of these items will disappear when you use the Get Nekkid button. This is a common misinformation among some Gaians. So I figured I would add it.
Save and Cancel
Once you are done dressing your Avatar make sure to hit the Save button. All unsaved items will not show up in other places. Including the front page. The Worlds, Forums, Guilds and other places. Until they are saved.
The Cancel button, will cancel all current changes you have made to your Avatar. Since your last save.
|
|
|
|
|
|
|
|
|
|
|
|
|
|
|
|
|
|
Posted: Wed Aug 26, 2009 10:46 pm
|
|
|
|
Full Inventory
This button will take you to a screen like this one. The options to choose from will be displayed differently here. Than in your regular inventory. Its also notable. That your Game Items, Aquarium Fish, Zomg items and all other items. That are placed in the Special category. Can not be seen from your regular inventory. So You have to use this one. Here, I will explain each and every one of the options displayed here.
All
Clicking all, will show you every item you have on Gaia. This button is discouraged. For outdated computers. As, more pictures being displayed on the screen. Could cause your computer browser to freeze.
Equip
This tab displays all items. That can be equipped to your Avatar. This includes all types of Clothing, Evolving Items etc.
Game
All items you have obtained from any of the Games. Here on Gaiaonline will be displayed here. From Fish that you have caught in fishing, Zomg Items to trash and bugs you have collected in the towns.
Special
All items that do not fit in any other category. Will be stored here in this one. That includes Rods used for fishing.
You will also find all usable items on Giaa in this category. A usable items, means that there is an item inside of an item.
There are a few types of usable items that you can obtain.
Giftboxes or Random Items Generators. These type of items. Have a set list of items. That you can obtain from them. There will always be more than one item. That you can possibly get. That is worth significantly more than the Random Item Generator or Giftbox itself. Though there is also a good chance. That you will be given an item. That is worth much less than the item itself. Basically, opening these types of items is a gamble.
Event items
Are those that you obtain. From one of the events. That Gaia holds from time to time. Christmas, Halloween and Easter. Are three holidays that Gaia celebrates every year. By taking part in these seasonal events. You will eventually obtain Event Items. Which you can either sell off to other players for Gold. Trade them for other items. Or open them to obtain the item inside. Its also important to note. With these types of items. There will be just one item you can possibly get in each Event Item. There will always be a number of different Event Items. That you can obtain from these events. Each with there individual number.
So, say you get an item that says. Easter Basket 2k6 (1 of 6). This means that the item. Is a 2006 Easter item. Plus it is item one out of a set of six different items. I'm using this particular item as an example. In this case. An item called a Bunny Tail, is located inside of this Event item.
Consumable items
Consumable Items, are those that once you use them. They will disappear from your inventory. By using one of these items. You will change the appearance of your avatar. An example of this type of item. Would be the Zombie 2k8 Potion. This will give your avatar. The appearance of a zombie.
House
This will display all items. That can be used for your home. In the Gaia Towns. Every item listed here. Can be used to furnish your Gaia Home. There are windows, furniture, floor tiles. You can add doors to your Home as well. There are a number of home items to choose from.
Zomg
This displays all items that you have obtained from Zomg. Including Rings, Items and Items Notes.
Aquarium
Here, you will find all items in your inventory. That can be used for your Gaia Aquarium. Including Fish, Backgrounds etc.
|
|
|
|
|
|
|
|
|
|
|
|
|
|
|
|
Posted: Wed Aug 26, 2009 11:04 pm
|
|
|
|
Export
Here I will be explaining how to use the different types of code creation tools located here. Picture codes are needed to post pictures online. Its a handy tool to have. Just make sure, you are mature and responsible with your posting. Do not post any pictures. That violation any rules for the website you are posting them on.
This will take you to another page of Gaia.
Here you can pick a background. From a number of tile choices.
Choose what information you would like displayed. To choose, just let click the white boxes belong this option. A check means you would like that information to be displayed. I recommend keeping the Show How Much Gold I have button unchecked. If you check this box. This means everyone that visits your profit. Can see how much gold you have. This will make you an easier target for account thieves.
Once you have chosen all of your options. Click make my badge.
You will see another page after this.
Quick Post, will open up another browser. To whatever website you want to add this information too. After you select a website that you want to post the information on. If you are not comfortable using the quick method on Gaia. You can always copy and paste the website code into your browser. It will produce the same results. Redirecting you to Myspace, Facebook or whatever website you decided to choose. Its important to note. That you can not use this option. For any of the listed websites. If you do not already have an account for that website.
Export your badge. Will give you a code. This code will allow you to post that information on almost any website you want to. Just left click the code to highlight it. Then right click on the code. Select copy from the list of options you will be given. Then paste, in any topic you want to display that information in. On Gaia, the information, will show up as just data. Hit Preview to see what your post will look like. After you hit the submit button. Then hit Submit to post the information.
Export an Avatar
Here, it will give you pretty much any code you will ever need. For posting your avatar on other websites. Or just somewhere else on Gaia. Different websites, require you to use different types of codes. The examples that are displayed here. Should give you a rough idea of what type of websites support what.
You can choose between a full body picture of your Avatar. Or just a head shot.
To use any of these codes. Just left click the code to select it. Then right click the code. Hit Copy, then bring it into whatever field you want to post it in and hit paste. The picture will be displayed as just a code at first. Here on Gaia, you can click Preview to see what the picture is going to look like. This is a habit you should get into. To make sure you are posting the correct picture. Before you click Submit.
Create a Sig
Customize your Gaia Sig here in the Sig Lab! You can use the slider bars to pick backgrounds, set the colors you want, and even adjust the transparency of the elements in your sig! After you have your sig the way you want, save it and link to it; you can use it anywhere you want to!
Info Displayed On Signature.
To change what information will show up on your signature. Left click the boxes. That are right next the options. If there is a check mark next to that option. This means, that this information will show up on your Signature. If it is not checked. It means that it will not show up. I highly recommend leaving the Show Gold/Friends Info unchecked. Displaying this information. Will just make you an easier target for account thieves.
Color Options
Here, you will see the follow options. Background Color, Nameplate Color, Name Color, Statistic Color.
Each one of these options. Controls a different part of the signature. To make changes to the color. Of each individual part of the Signature. Left click and hold. On the white arrows below each option. You can change the amount of red, green, blue and black. That is used in each part of the signature by doing this. Different combination's, will yield different colors and results. You can see what the different colors are doing to your signature. In real time by looking at the Sig Preview at the top of the page. You might have to scroll up to see it. Depending on what the size and settings are on your computer screen.
|
|
|
|
|
|
|
|
|
|
|
|
|
|
|
|
|
|
|
|
|
|
|
|
|
|
|
|
|
|
|
|
|
|
|
|
|
|
|
|
|
|
Posted: Sun Aug 30, 2009 10:45 am
|
|
|
|
Games
Jigsaw
To play Jigsaw. First select games from the top menu. You will be taken to another screen that says Jigsaw 1, 2, 3, 4, 5 and 6. Select whichever you want to proceed. Then you will see another screen. This time, you have two different types of rooms. Permanents rooms, which will never disappear. These rooms were created by moderators. Then there are User Created Rooms. Note the three categories for these rooms. Permanent Rooms, will have the room name. Along with the number of players in that room. If there are six people in a room. This means that the room is currently full. In the case of user created rooms. You have three categories. The name of the room, the number of players in that room. Along with another field that says password. If there is an x under this area. This means that it requires a password to enter this room. Keep in mind, this is NOT your password it is asking for. It is a password specifically for that room. Some people like to make locked rooms. Just to play in solitary. Others like to have a place to invite there friends. Or some sort of a guild hangout. Password protected rooms, can only be entered if you know the password. The creator of the rooms name will be displayed in the room name. It will be (insert name here)'s room. So, if say I made a room. It would say Lanceknightmare's room. If you would like the password for that particular room. You can send the user a private message. Politely asking if you can join them. If they so no. Don't be insistent or ask more than once. Also, once you send then a private message. DO NOT send them a comment or another message asking again. This is almost certainly guarantee that you are not getting into that room.
Now that you have chosen a room. Not the different features to this room. Your gold total will be displayed in the top left hand corner. The users will be displayed under this. It will say choosing puzzle. If the user has not yet chosen which puzzle they wish to finish. If you scroll over this information. You can see there user name as well.
Invite Friend to Sit Here
Once you click this button. It will give you a code link for the room you are in. Just open up another browser. Then send one of your friends a pm. To copy the code, left click on the code to select the whole thing. Then right click and hit copy. When you send your friend a pm. You might want to add some sort of message. Letting them know what the link is for. Or it will most likely be overlooked. In the message, right click and hit paste to paste the message into the pm. The button at the top right hand corner. Share with friend, does the same thing as this button. Also, the Invite Friend to Sit Here button. Will not be displayed when the room is full of users. So you will have to use the Share with friend button in this case.
?
This button is located in the top right hand corner of the screen. By clicking on this button. It will take you to a help screen. With commonly asked questions and answers to things concerning Gaia.
The other two options next to this. Are for turning off the sound in the room. Along with turning off the music in the room.
Save
This button, will save your current puzzle. At whatever status you were at with it. You can then close the browser and go do something else. Then come back later and resume with the puzzle you were working on.
Shuffle
This moves the pieces of the puzzle around. It can be used if you are stumped and are looking for a different vantage point to view the pieces from.
Back
This button, will take you back to the puzzle selection screen. Be careful when using this button. If you hit ok, all unsaved progress will be lost.
Preview
This shows what the puzzle will look like when completed. Its a handy tool much like the front of a puzzle box.
Change BackGround
This button is located below the puzzle in the lower left hand corner. It will change the background color behind the puzzle.
Below that is the chat field. Type whatever message you want to send to another user in the room here. Keep in mind that all users in the room can see what you are typing.
Report Abuse
This is for when a user is breaking one of the Terms of Service. Before using this button. You HAVE to read the Terms of Service. If you don't and you report someone. For something that isn't covered in the Tos. You might be sent a warning instead of that person for abusing the Report System.
Ignore User
Someone getting on your nerves? You can use this tool. After you press this button. A list of the users in the room with pop up. Select which ever one you want to ignore. Then click Ignore to accept. Or hit Cancel if you change your mind. Or have just accidentally hit the ignore button. Once a user is on Ignore. You will be unable to see any of there text. Though other users will still be able to read what they are saying.
The different modes of Puzzles.
Easy = 30 pieces Normal = 60 pieces Hard = 120 pieces Insane = 300 pieces
Every puzzle has these three options. As you finish puzzles. The amount of gold you get from each one will slowly go down. This will refresh after the day has passed. So, the highest gold you can gain in a day of doing puzzles. Is obtained by finishing a bunch of Insane puzzles. In additions to the added amount of gold you can gain from the higher modes. There will be occasional bonus items you will gain by finishing puzzles. The bonuses you gain. Are more valuable in the higher modes. Also, there is a common mistake users make. If you intend to work on an Insane puzzle. DO NOT do a bunch of normal puzzles before this. It will only lower the amount of gold you will get on completion.
An example of how much gold you can gain from puzzles is as following.
The first Medium Puzzle I finished for the day. Gave me 123 gold. The second Medium Puzzle I finished for the day. Gave me 103 gold. The third gave me 93 gold plus I happened to get a bonus item. A Gaia Artwork #20.
Do you see how, the more you do puzzles in a day. The less gold you will get from each one. None the less, it is well worth doing puzzle for someone starting out looking for easy gold. Or just for something relaxing to do. As a beginner, its not a good idea. To just focus on one activity or game all the times. You should sample everything to find out what you like about the website. This will also expand your knowledge about the place.
|
|
|
|
|
|
|
|
|
|
|
|
|
|
|
|
|
|
|
|